Creating your own funny clip-art card isn't difficult and placing it on e-cards is also a straightforward process. If you really want to personalize your cards clipart and make someone smile or laugh at the same time, you're definitely on the right track with this ideas of card.Download the
Photo Collage Software First
Part 1: Make Fun Clip Art CardBrainstorm your clipart design ideas of card by sketching or doodling them in a sketchbook using colored pencils. Silly or goofy designs can often be the most amusing. Ironical ideas card or witty clip-art carddesigns can also be quite funny and memorable. Remember that the goal is to create clip-art card to make someone smile when she opens the clip art card, so the art shouldn't be too involved. It's best to avoid anything distasteful.
The first step in creating your clip-art card is selecting the individual pieces you want to use. This includes photos, clip art, stamps and text tabs. Each tab allows you to add a different type of cards clipart component. Simply choose the category you wish to view from the pull-down, then drag-n-drop the clipart cards or stamp you want in the same way that you added your images. Rotate, resize, crop and reposition each piece as you see fit. To add text, just switch to “Text” tab, and click ‘New Text” and then type your text in the text box. You can also set your font, size, style, alignment and color. Check the Shadow box to add a shadow to your text.
 Part 2: Print your Clipart Cards
In Print Clip Art Card tab window, you can print your cards clip art directly using the print tool in
Photo Collage Studio. Before that, you could specify settings about how to print your clipart.
1. Select PageIf you have create many pages of clip art card in one project and you want to print only some of clipart cards, you should select desired pages to print. To do so, click the button

to bring up a window to select pages from. By default, all pages would be checked to print. To print specified pages, you have to uncheck the pages you don't want. Make sure that only the pages you want to print have the tick sign at the bottom left corner of each page thumbnail.
2. OrientationSelect page orientation of your clip art card on the top left hand side. By default, the orientation would be Portrait. Portrait works for most documents, which means its height is taller than its width. On the other hand, you can select to print your clipart page in Landscape orientation, which means its width is longer than its height.

To make advanced settings for printing clipart, you can click button

to open the setting dialog, in which options of Printer, Page range, Copies and so forth are available. You can even make in-depth parameters of selected printer by clicking "Properties" button beside the printer name drop-down list. See the printer manual for detailed information if possible.
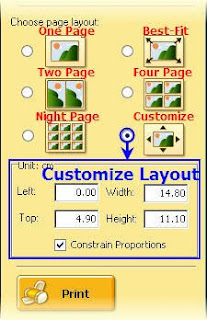
3: Lay-outThe layout option allows you to select or customize the layout of your selected clip art card pages. For a fixed background, you can contain one, two, four or night pages in the same printed cards clip art page. Furthermore, you can make your selected clipart cards pages best fit the background or customize the layout yourself.
As soon as all the settings have been done, you could print all your selected clip-art card pages now!